Since I first started thinking about these kind of things, I've always painted my figures from the inside out, by which I mean that I start with the skin and then the clothing and accoutrements closest to it, working my way outwards. A recent post by DeanM on http://wabcorner.blogspot.com/ and a reread of of Kevin Dallimore's first guide to painting made me decide to try it the other way around to see if it were any easier or faster. I also decided to try and document the process, although, as can be seen below, I shan't be winning any painting or photography awards any time soon. The question was though, what to paint? It had to be something reasonably simple, and something I was familiar enough with to be able to compare the process with my normal way of doing things.
At the moment, I am in the throws of repainting and 'upgrading' a couple of Foundry French units that were painted many moons ago, in an attempt to refurbish them for a game I hope to hold in the spring. They don't really fit in with the style of my more recently painted figures, especially not since I have abandoned the painting of eyes (if mine are going then so can my troops'!). I have also changed my standard French battalion from a 35 figure unit - 34 infantry plus 1 mounted colonel - to 40 strong - 6 companies of 6, a command stand of 3 with eagle/fanion and separate mounted officer. So I basically need a few extra troops to fill in the gaps and a pack of 8 French infantry in greatcoats would do the job.
Here is a brief run through of what I did. I'll let the pictures do most of the talking.
Stage 1
First off, the metal work on the muskets. Painted with Chainmail 35A, highlighted with Metal 35B and then washed with Badab Black.

Stage 2
The white cross-belt, shoulder straps and piping, all done with the Foundry white triad. I tend to use this for belts and the Austrian White triad for trousers, jacket fronts and the like.

If there is one thing I positively hate painting on French Napoleonics, it's the piping on the backpacks. It drives me mad. This time, however, I didn't have to worry too much about getting the white paint in the wrong places and it was easy to clean up any mistakes.

Stage 3
The next stage was painting the flesh, musket, back pack and canteen strap. I always like to paint the face; each one turns the figure into an individual and makes it easier for me to paint somehow.

Stage 4
Now some bigger areas of the figure get covered: the trousers and the shako covers. I used 2 different colours on the covers, Foundry Canvas and Boneyard, for a bit of variation.

Stage 5
This is the reason I will never be a photographer! Despite taking 3 photos, I managed to get all of them out of focus. You might just be able to make out the addition of the brass buttons and stock plate and the canteen...

Stage 6
Finally, I got to paint the greatcoats. I wanted to really see how much faster I could paint here, with all the "detailling" already done, so I used a size 4 brush. It really wasn't hard to do at all - and it was much faster! 3 different triads here, as my French are a ragtag bunch, but only the shade and base colour, as I find the highlights just too stark. I also painted the black items: shoes, cartridge box and shako peak.

Stage 7
The last, and easiest, stage of all. I had already washed the shako covers, now it was the turn of the greatcoats. In future I'll do both at this stage to speed things up. Devlan Mud and Gryphonne Sepia were used and then the bottom of the great coats, the trousers and the shoes were given a quick going over with the weathering stick.

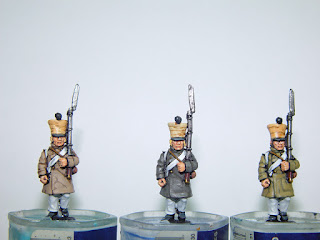
So here we have the (nearly) finished product. They still need varnishing and basing, of course, but I tend to do that all in one go if I can.

So, was it quicker and easier? Well, as to the first, despite using the big size 4 brush, I can't be absolutely certain, as I was painting some other figures in parallel, but I'm pretty sure that if I'm clear on the order and what I need to paint when, using this technique will significantly speed my painting up. As for easier, well I think it is. Getting all the fiddly bits out of the way when you can correct them without fear of going over something else makes for a much more relaxed process too. I'm definitely going to be giving this a try with my SYW project.
I think they look very good! Interesting approach... Cheers, Simon
ReplyDeleteMy approach is more psychological for masses of irregular 15mm.. so I put the common colours such as armour, flesh, spears on first, then as each colour goes on, it is much more rewarding.
ReplyDelete